Automatic Adding Colours to a Project (Version 2): Difference between revisions
From Diamond Painting Logbook Wiki
Jump to navigationJump to search
Created page with "From the project details, select the scan for colours from the Colours section Select the Select Image button This will load the photo library, select the image that has the key From the full screen image, select the area you'd like to read It'll show you what colours its matched against * From this screen you can also tap the image again to adjust the selected area * You can select the select image button again to change the image * If it picks up a colour thats no..." |
No edit summary |
||
| (One intermediate revision by the same user not shown) | |||
| Line 1: | Line 1: | ||
From the project details, select the scan for colours from the Colours section | From the project details, select the scan for colours from the Colours section | ||
[[File:Add-colours-automatic-v2-1.png|frameless|300x300px]] | |||
Select the Select Image button | Select the Select Image button | ||
[[File:Add-colours-automatic-v2-2.png|frameless|300x300px]] | |||
This will load the photo library, select the image that has the key | This will load the photo library, select the image that has the key | ||
From the full screen image, select the area you'd like to read | From the full screen image, select the area you'd like to read | ||
[[File:Add-colours-automatic-v2-3.png|frameless|471x471px]] | |||
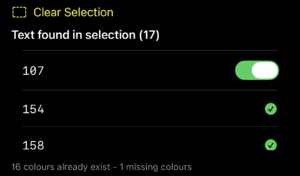
It'll show you what colours its matched against | It'll show you what colours its matched against | ||
[[File:Add-colours-automatic-v2-4.png|frameless|479x479px]] | |||
* From this screen you can also tap the image again to adjust the selected area | * From this screen you can also tap the image again to adjust the selected area | ||
* You can select the select image button again to change the image | * You can select the select image button again to change the image | ||
* If it picks up a colour thats not already in the system, it presents the option to add it | * If it picks up a colour thats not already in the system, it presents the option to add it | ||
* [[File:Add-colours-automatic-v2-5.png|frameless|300x300px]] | |||
If it picks up an old DAC colour (100-148) then it auto adjusts as they're stored as ABXXX in the database | If it picks up an old DAC colour (100-148) then it auto adjusts as they're stored as ABXXX in the database | ||
Select the button to save the colours to the project | Select the button to save the colours to the project | ||
[[File:Add-colours-automatic-v2-7.png|frameless|300x300px]] | |||
It will then prompt if you want to import more colours | It will then prompt if you want to import more colours | ||
[[File:Add-colours-automatic-v2-8.png|frameless|300x300px]] | |||
The colours can then be seen in the colour list for the project | The colours can then be seen in the colour list for the project | ||
[[File:Add-colours-automatic-v2-9.png|frameless|300x300px]] | |||
[[Category:Colours]] | [[Category:Colours]] | ||
[[Category:Projects]] | [[Category:Projects]] | ||
[[Category:Adding Colours]] | [[Category:Adding Colours]] | ||
[[Category:Version 2]] | [[Category:Version 2]] | ||
Latest revision as of 14:16, 14 January 2026
From the project details, select the scan for colours from the Colours section

Select the Select Image button

This will load the photo library, select the image that has the key
From the full screen image, select the area you'd like to read

It'll show you what colours its matched against

- From this screen you can also tap the image again to adjust the selected area
- You can select the select image button again to change the image
- If it picks up a colour thats not already in the system, it presents the option to add it

If it picks up an old DAC colour (100-148) then it auto adjusts as they're stored as ABXXX in the database
Select the button to save the colours to the project

It will then prompt if you want to import more colours

The colours can then be seen in the colour list for the project

